Everyone needs a Valentine project, right? I think so at least. *this pattern has been edited as of 13/1/24. However, there may be issues with the notation of the cables themselves. I have noted that some patterns are using fc and bc (front cross and back cross) and others describe the movements rather than giving an abbreviation. Please let me know if there are still issues with the current notation)

You will need:
4.5mm circular knitting needles
Cable needle
Darning needle
100gm of DK yarn
C4B – Place 2 stitches onto a cable needle, hold the needle behind your work, knit 2, knit 2 from the cable needle. This moves the cable to the right.
C4F – Place 2 stitches onto a cable needle, hold the needle in front of your work, knit 2, knit 2 from the cable needle. This moves the cable to the left.
C2B – Place 1 stitch onto a cable needle, hold the needle behind your work, knit 1, knit 1 from the cable needle. This moves a stitch to the right.
C2F – Place 1 stitch onto a cable needle, hold the needle in front of your work, knit 1, knit 1 from the cable needle. This moves a stitch to the left.
Cast on 100, (112, 120) on 4.5mm needles
K2, P2 rib for 20 rows
Place a row marker, knit 20, place cable marker, purl 2, knit 8, purl 2, place cable marker, knit to the end of the row.
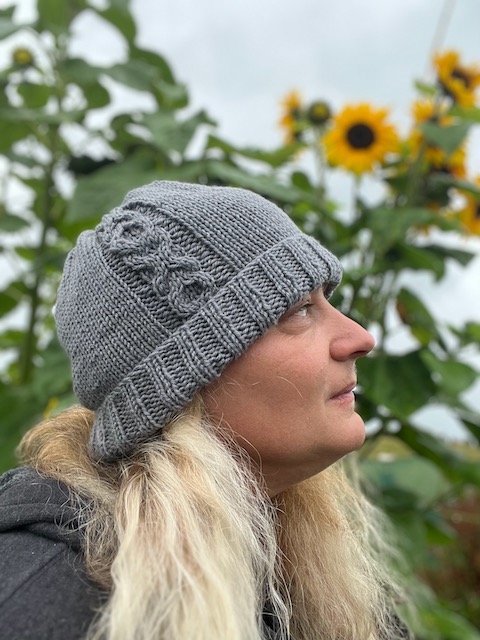
The XOX cable panel runs up the side of the hat on a XXX row repeating pattern.
Row 1: Slip marker. Knit 20, slip marker, purl 2, C4B, C4F, purl 2, slip marker. Knit to the end of the row.
Row 2-4: Slip marker. Knit 20, slip marker, purl 2, knit 8, purl 2, slip marker. Knit to the end of the row.
Row 5: Slip marker. Knit 20, slip marker, purl 2, C4F, C4B, purl 2, slip marker. Knit to the end of the row.
Row 6-8: Slip marker. Knit 20, slip marker, purl 2, knit 8, purl 2, slip marker. Knit to the end of the row.
Row 9: Slip marker. Knit 20, slip marker, purl 2, C4F, C4B, purl 2, slip marker. Knit to the end of the row.
Row 10-12: Slip marker. Knit 20, slip marker, purl 2, knit 8, purl 2, slip marker. Knit to the end of the row.
Row 13: Slip marker. Knit 20, slip marker, purl 2, C4B, C4F, purl 2, slip marker. Knit to the end of the row.
Row 14-16: Slip marker. Knit 20, slip marker, purl 2, knit 8, purl 2, slip marker. Knit to the end of the row.
This creates one pair of an X and an O. Remove the cable markers at this point.
Repeat these 16 rows one more time. (This makes up rows 17-32)
This next section ends the cable panel on the side of the hat
Row 33: Slip marker. Knit 19, C2B, purl 1, knit 8, purl 1, C2F, knit to the end of the row
Row 34: Slip marker. Knit 20, C2B, knit 8, C2F, knit to the end of the row
Row 35-36 – Knit all stitches
(For larger sizes, repeat rows 35-36 0 (1,2) times)
Decreasing at the top of the hat:
Row 37: Knit 3, knit 2 together. Repeat over whole row
Row 38: Knit the whole row.
Row 39: Knit 2, knit 2 together. Repeat over whole row
Row 40: Knit the whole row.
Row 41: Knit 1, knit 2 together. Repeat over whole row
Row 42: Knit the whole row.
Row 43: Knit 2 together. Repeat over whole row
Row 44: Knit the whole row.
Row 45: Knit 2 together. Repeat over whole row
Cut the yarn with 30 cm of tail remaining. Slip the remaining stitches onto this and pull tight. Darn in your yarn tails. You can leave it as it is or sew on a pom-pom.

Leave a Reply