Well, this project has been on the go for a few years, and undergone a few trials… and I think I am happy with stating that this is the first size-inclusive pattern I have attempted to share with the internet. As such, it is a bit more of a challenge to understand than some, but this will translate into a top for a person of any size or age.
You will need:
– Chunky yarn
– 7mm knitting needles
– 6 buttons
– A tee shirt that fits the recipient
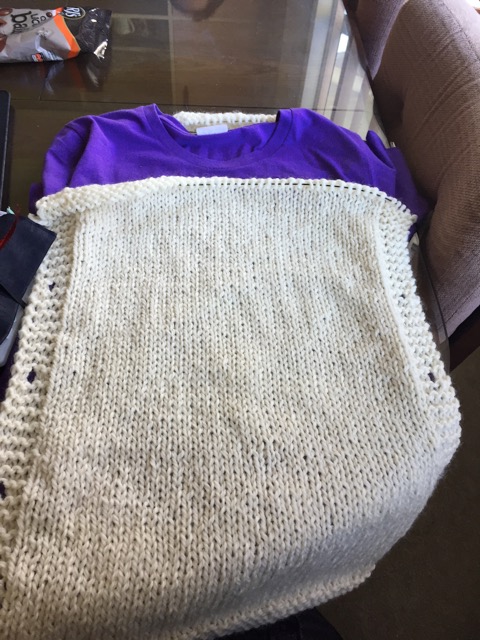
This is where things get a little different from most of my patterns. I have found that finding a teeshirt that fits the person you are knitting for works best… this should be one that can be tucked in (eg not cropped) and fits them well (not incredibly oversized or tight). This will become the working pattern.
Start with the Back
Measuring the width of your tee shirt, cast on enough stitches to reach this. The bottom of the tunic is done in garter stitch, so these will stay pretty much the same width as you cast on (or slightly wider when done but nothing too drastic). You can measure your tee shirt, but I found it easier to keep the shirt in my knitting bag and refer back to it frequently. For my example pattern, this is a small-medium womens size. Cast on 50 stitches.
Garter stitch – this is all knit rows – 10 rows. If you are making one for a small/young child, I would suggest doing either 6 or 8 rows here rather than all ten. However, the 10 rows does give 5 lines of stitches and holds the front nice and flat.
You will now follow the same pattern for the entire length of your tunic. You can slip the first stitch on each row, but if you do this, drop the number of knit stitches on the wrong side to 4 at the start of the row. This will keep the edge neat but if you are a beginner you can easily skip this step.
Right side: Knit all stitches
Wrong side: Knit 5, purl to last 5, knit 5. (if making for a small child, I would knit 4, purl to last 4, knit 4)
When you get to the full length of your tunic, divide your stitches into 3. For example, my given one here is 50 stitches. When divided by 3, this is 16.66 (which is a bit useless) but it would work as 17, 16, 17. Cast off the first third of your stitches (in my example, this is 17), knit the next third (knit 16), cast of the last third (cast off 17). Slip the remaining stitches onto a stitch holder or waste yarn. These are for the neck.
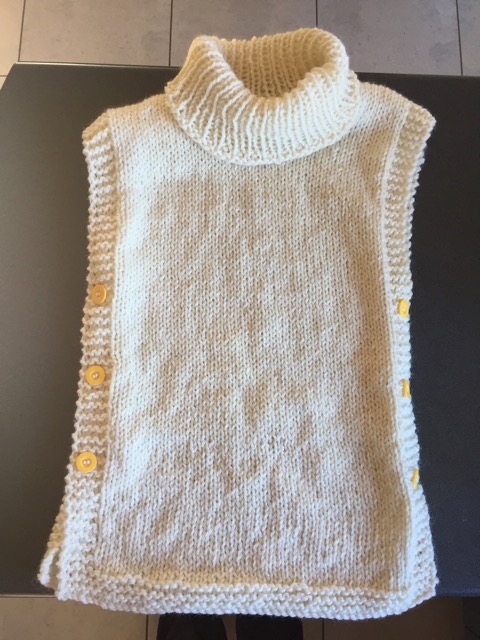
The front
The front is very similar to the back, but with added button holes on the sides, and a different neck shaping.
Cast on the same number of stitches (eg 50)
Knit 10 rows
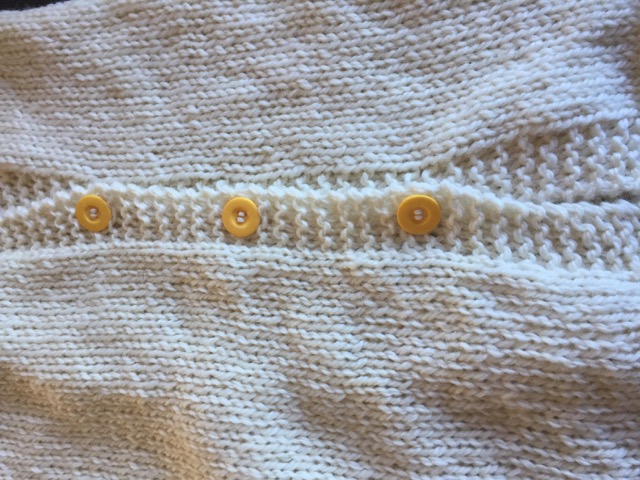
Lay out your back piece and decide where to put the 3 buttons on each side. I like to have the bottom one at about the natural waist, which is a flattering point to bring in a garment, and the other 2 above this, leaving enough room for the arms. You can decide the bottom button location from the waist of the wearer, and the top one by where the sleeves of the tee shirt begin. For my example, this worked out to be in 16 row gaps. So I followed the pattern until row 16 (8 raised ridges from the bottom band), and then added a button hole row. I did all the button hole rows on the 16th row on the right side.
Pattern rows
Right side: Knit all stitches
Wrong side: Knit 5, purl to last 5, knit 5. (if making for a small child, I would knit 4, purl to last 4, knit 4)
Button hole row: Knit 2, yarn over, knit 2 together, knit to the last 4 stitches, knit 2 together, yarn over, knit 2.
On the following wrong side row, knit 5 including knitting the yarn over loop as a stitch. You will now have a hole in your knitting.
Continue the pattern until you get to the number of rows remaining that correspond with your middle third of stitches – in my example this is 16 stitches set aside for the neck, so 16 rows before the cast off point of the back. Divide your stitches into 2. In my case, this is 50 stitches, in half is 25. Divide the number of neck stitches into 2 (in my case, this is 8. If you end up with an odd number, this is fine. Slip a stitch marker or pin through this stitch and save it for later. Do not knit it again until the collar.)
Knit to the middle point. Turn your work and continue these stitches on the right hand side of the tunic. Purl 2 together, purl to the last 5, knit 5. Repeat this for the number of stitches in your neck. Knit the stitches on this side, turn your work, Purl 2 together. In my example this is 16 rows, decreasing 8 stitches on the purl side total. Cast off this side.
Work the stitches on the left hand side now. Knit all the stitches. Purl 5, purl to last 2 stitches, purl 2 together. Repeat for the same number of rows. Cast off.
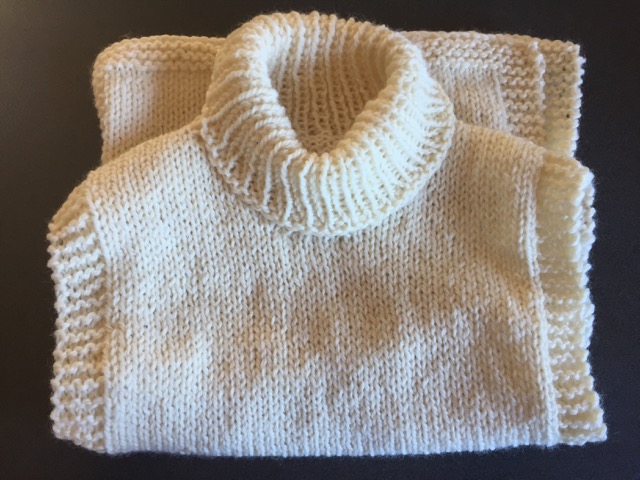
The Neck

You will now have a front and a back without a collar. Lay them together right sides together and stitch up one shoulder seam. Unfold. Pick up all the stitches on the stitch marker (in my case 16, then pick up the stitches along the front collar edge. If you had an odd number of stitches, pick this random stitch on the stitch marker up as you go.
Knit 1, Purl 1 rib over the these stitches. If you have an even number of stitches, these rows will repeat as knit 1, purl 1. If you have an odd number, you will need to purl 1, knit 1 on the wrong side rows. This is now your chance to decide how long you want your collar to be. In my example, I made this a longer collar folded over…. This worked out to be 30 rows in total. You could do a short flat collar of 10 rows…. or a shorter folded over and stitched collar of 20 rows. The choice is up to you.
When you have the length you desire, cast off in rib pattern loosely.
Place the right sides together again and stitch up the shoulder and collar seam as one. Darn in your yarn tails.
Stitch on your buttons and you are good to go.


Leave a comment